 |
| Pileated Woodpecker |
Saturday, July 2, 2011
Week 34 - Best of Project 365 - June
My favourite picture from June from my Project 365 is this one of a Pileated Woodpecker taken from my Mom's balcony. He was making a pig of himself on the suet my Mom puts out but nicely paused long enough for me to take this picture. It was another difficult choice this month. Other candidates included the snail and the maple leaves that I changed the colour on so they look bronzed although there are a few others that could have just as easily been picked.

Saturday, June 25, 2011
Week 33 - More Pinhole Photography
I've continued to play with my pinhole lens and I've gained a greater appreciation of when and where I like its effect. Architectural photographs seem to work nicely. It also seems to work better with a heavy grain and a little vignette. I could probably achieve the same look with gaussian blur in Photoshop but this is one of those situations where the process is at least as important as the final outcome.


Saturday, June 18, 2011
Week 32 - Trip to Vancouver
I was in Vancouver this week for a quick visit with family and was astounded by the number and variety of birds showing up to my Mom's feeders. Too many predators in my neck of the woods I suppose. That and I had to take my feeders down when a bear climbed up on the balcony one night and ate one of them. In any event, it was a busy trip and I didn't have much time for photography but I did manage a few nice pictures.
 |
| Downy Woodpecker |
 |
| Stellar's Jay |
 |
| Purple Finch |
 |
| Stellar's Jay |
Saturday, June 11, 2011
Week 31 - Pinhole DSLR
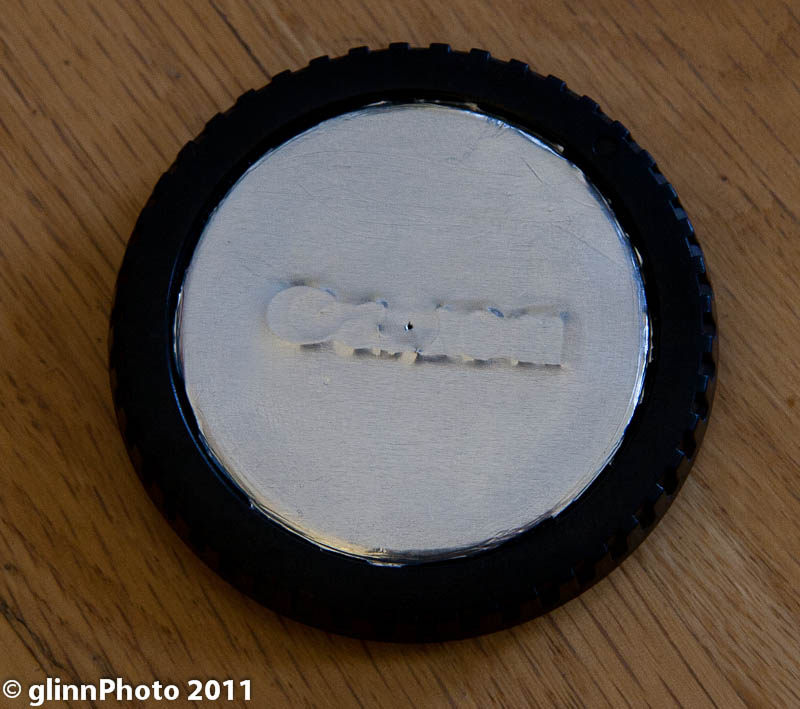
After reading articles about professional photographers using pinhole cameras I decided to give it a try. Simple enough to get started, I got onto EBay and ordered a few body caps for my Canon 20D. Once they arrived, I drilled a 1/4 inch hole through the centre, put foil tape over the hole and poked a hole in it with a pin. I poked too big a hole in my first attempt and the pictures were unacceptably blurry. Second attempt is a little better but I might try a third time with a smaller pin.
Here it is, my home-made, body cap pinhole camera. Look closely at the center and you'll see the pin hole.


I'm still experimenting as to when the pinhole "lens" will be the right tool to use but it is fun. The big downside is that every single speck of dust on my sensor show up and needs to be taken out in post-processing.
Here it is, my home-made, body cap pinhole camera. Look closely at the center and you'll see the pin hole.
And here is a picture taken with this "lens". It's a self portrait, or at least the grey blur on the right is me.

I'm still experimenting as to when the pinhole "lens" will be the right tool to use but it is fun. The big downside is that every single speck of dust on my sensor show up and needs to be taken out in post-processing.
Saturday, June 4, 2011
Week 30 - Best of Project 365 - May
There are a lot of pictures of flowers this month in my Project 365 so it shouldn't really be a surprise that my favourite this month is a picture of a flower.


Saturday, May 28, 2011
Week 29 - Tulip Lifecycle
If you have been keeping up with my Project 365 you may have noticed several pictures of tulips. I decided to photograph the same patch of tulips from buds to flowers to... not flowers anymore. Well, the project has gone as far as it's going to get this spring. Here is a sampling of the series.


Saturday, May 21, 2011
Week 28 - Lightroom 3
I don't think I've done a post yet about how I am storing, sorting and post-processing my images. Well the answer is Lightroom 3. Okay, that isn't the complete answer. First I get the images from my camera, save them to a portable hard drive, save them again to a networked drive and then finally import them into Lightroom. Do I really need that many backups? I have one backup on the network to guard against hard drive failure and another portable backup to guard against fire or theft. That feels like the right number for me.
That finally brings us back to Lightroom. For years I just used the Canon software that came with the camera to sort and edit photo but found I was too limited by the tagging and sorting options and also needed better photo editing software. I started reading reviews and blog posts on the subject and decided that, for my needs, Lightroom 3 and Photoshop Elements would be good. So far, things have worked out well. I still think about Photoshop CS5 but I need the capabilities of Elements so rarely that it's hard to justify the expense. Lightroom manages my library and does almost all of my post-processing as well. Only occasionally do I want an effect like in my recent post about false miniatures that requires Elements.
Here is a before and after example of a simple change in Lightroom that creates a great effect. I simply used the saturation sliders which are split by colour and removed every colour except red and orange. By the way, the before and after comparison is a feature of Lightroom, this is just a screen capture.

 And here it is after applying on of the presets.

That finally brings us back to Lightroom. For years I just used the Canon software that came with the camera to sort and edit photo but found I was too limited by the tagging and sorting options and also needed better photo editing software. I started reading reviews and blog posts on the subject and decided that, for my needs, Lightroom 3 and Photoshop Elements would be good. So far, things have worked out well. I still think about Photoshop CS5 but I need the capabilities of Elements so rarely that it's hard to justify the expense. Lightroom manages my library and does almost all of my post-processing as well. Only occasionally do I want an effect like in my recent post about false miniatures that requires Elements.
Here is a before and after example of a simple change in Lightroom that creates a great effect. I simply used the saturation sliders which are split by colour and removed every colour except red and orange. By the way, the before and after comparison is a feature of Lightroom, this is just a screen capture.

In addition to all the manual work that can be done in Lightroom, there are also some pre-sets that come with or can be added to Lightroom that can create some very interesting effects. For example this picture is straight out of the camera.


Subscribe to:
Posts (Atom)